
Contents
Have you ever wondered why many technicians struggle to detect hidden electrical insulation faults, even with advanced tools? The answer often lies in choosing the right testing device. In this article on the Tech4Ultra Electrical website, you’ll learn how to select between a Megger, an insulation tester, and a megohmmeter—and why making the right choice can dramatically improve your testing accuracy and electrical safety.
What is a Megger and Why is it Important?
I still remember the first time I used a Megger. I was skeptical. All I knew was that it measured resistance, but I didn’t quite get the big deal. Turns out, this tool does more than check wires—it can actually save equipment and lives. A Megger is essentially a high-voltage insulation tester that measures resistance in ohms (often in megaohms) between conductive parts and their insulation. It applies a DC voltage—usually 500V or 1000V—and observes the resistance value to determine the integrity of the insulation.
Importance in Measuring Insulation Resistance
Why does this matter? Imagine you’re installing new cables in a commercial building. If the insulation is weak, you might not notice—until something shorts out or worse, starts a fire. A megohmmeter like the Megger helps catch those problems before they escalate. By testing the insulation resistance, it ensures that the equipment is safe and compliant with safety standards like IEC and IEEE. No more guessing—just facts and numbers you can trust.
Differences Between Megger, Insulation Tester, and Megohmmeter
Here’s a quick clarification: all Meggers are insulation testers, and all insulation testers measure using a megohmmeter principle. The terms are often used interchangeably, but technically, a megohmmeter refers to the measuring mechanism, an insulation tester is the category of tool, and Megger is a brand name that became synonymous with the function—kind of like “Xerox” for photocopies.
Read Also: Motor Protection Guide: Types, Devices, Faults & NEC Selection Tips
History and Evolution of the Megger
Early Models and Origin
Let’s rewind to the late 1800s—when electricians relied more on instinct than tools. The Megger was born out of necessity, developed by the British company Evershed & Vignoles in 1889. Back then, insulation testing was crude at best. These early insulation testers were heavy, manual crank devices that needed strong arms and even stronger patience.
Development Over Time: Analog to Digital
I once used an analog megohmmeter on a generator test—it felt like spinning a time machine. As technology evolved, so did the Megger. From bulky, mechanical dials to sleek, digital displays, these devices have become more accurate, safer, and easier to use. Digital insulation testers now offer auto-ranging, data logging, and even Bluetooth connectivity.
Milestones in Insulation Resistance Technology
Key milestones? Auto-discharge circuits, rugged waterproof casing, and multi-voltage testing options stand out. These upgrades didn’t just modernize the Megger—they made it a standard in electrical safety across industries.
Detailed Working Principle of Megger
Explanation of Electromagnetic Induction
I’ll admit—understanding how a Megger works didn’t click for me until I saw it in action. At its core, it uses electromagnetic induction to measure insulation resistance. When you rotate the handle (in analog models), it spins a DC generator. That movement creates a voltage output thanks to Faraday’s law—electromotive force induced by changing magnetic fields.
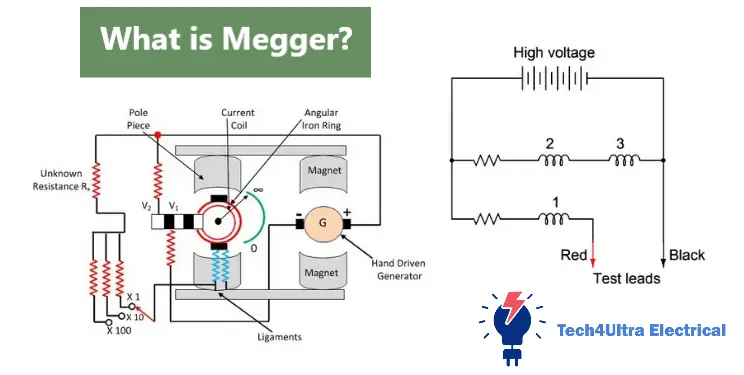
Role of DC Generator, Voltage Coil, and Current Coil
The heart of the megohmmeter consists of three components: the DC generator, a voltage coil, and a current coil. The DC generator produces a high voltage (typically 500V–1000V). The voltage coil is connected across the insulation being tested, while the current coil carries current that flows through the leakage path of the insulation. Both coils are mounted perpendicular to each other on the same spindle.
Torque Mechanism and Pointer Movement
This is where it gets cool. The interaction of the magnetic fields in the two coils generates torque in opposite directions. When insulation resistance is high, little current flows, so the current coil has minimal effect, and the pointer swings toward the “infinity” mark. When resistance is low, more current flows, and the opposing torque from the current coil pushes the pointer toward zero. Simple, yet brilliant.
Circuit Diagram and Step-by-Step Process
Picture this: a high-voltage DC source feeding into a test circuit with the unknown resistance (insulation). The meter movement reflects the balance of forces from the voltage and current coils. Step-by-step, you:
- Connect the insulation tester across the device under test.
- Apply voltage via the internal generator.
- Measure resulting current through the insulation.
- Read the resistance value directly on the scale.
That’s the essence of how a Megger gives you real-time insulation diagnostics with nothing more than physics and clever engineering.
Construction and Internal Components
Major Components: Generator, Voltage/Current Coils, Pointer, Scale
When I first opened up an old analog Megger, I was amazed by how straightforward yet genius its layout was. At the core, you’ll find a DC generator that powers the system. It’s coupled with two perpendicular coils—a voltage coil and a current coil—mounted on a spindle. The balance of forces from these coils controls a pointer that sweeps across a calibrated scale, indicating insulation resistance in megaohms.
Mechanical vs Digital Construction
There’s something nostalgic about the hum of a mechanical insulation tester. But let’s be real—digital models have taken things to another level. Mechanical meggers rely on manual cranking and analog displays, while digital versions use electronic circuits and sensors to achieve faster, more precise readings. They even come with backlit screens, memory storage, and automatic range detection.
Safety Features and Design Advancements
Today’s megohmmeters aren’t just more accurate—they’re safer. Many include built-in discharge circuits to prevent shock when disconnecting after a test. Some models also feature dual insulation layers, overload protection, and rugged housings that are drop- and water-resistant. These enhancements make modern Meggers suitable for industrial-grade applications in harsh environments.
Types of Megger Instruments
Hand-Operated Megger
My first encounter with a hand-operated Megger was during an on-site transformer check—no batteries, just muscle power. These analog devices use a crank to generate the test voltage. They’re simple, reliable, and surprisingly accurate for basic insulation tests, especially in areas where electricity isn’t available. But let’s face it—they’re not ideal for high-volume or precision work.
Digital Megger
Then came the digital Megger—a total game changer. These are equipped with electronic circuits, LCD displays, and automated testing functions. They offer high accuracy, minimal user error, and often include features like auto-ranging, internal memory, and even Bluetooth. If you’re serious about insulation testing, a digital megohmmeter is hard to beat.
Battery-Operated and High-Voltage Meggers
For high-demand tasks, there are battery-operated and high-voltage Meggers. These are portable yet powerful, offering test voltages from 500V up to 10kV. Perfect for industrial motors, switchgear, and HV cables. They’re robust, reliable, and can handle heavy-duty insulation resistance testing in the field.
Comparison Table
| Type | Power Source | Accuracy | Typical Applications |
|---|---|---|---|
| Hand-Operated Megger | Manual Crank | Moderate | Basic field testing, low-voltage circuits |
| Digital Megger | Electronic/Battery | High | Industrial testing, facility maintenance |
| High-Voltage Megger | Battery | Very High | HV cables, transformers, switchgear |
How to Use a Megger: Step-by-Step Guide
Safety Precautions Before Testing
Before you even touch a Megger, pause. This isn’t just a multimeter—we’re talking about high-voltage testing equipment. First rule: always de-energize the circuit. Then discharge any stored energy, especially in capacitive systems. Wear insulated gloves, safety glasses, and double-check grounding. Trust me, skipping these steps can lead to a painful—or costly—lesson.
Procedure to Test Insulation Resistance
Using a megohmmeter is pretty straightforward once you’ve got the hang of it. Here’s the process I follow:
- Turn off power to the circuit or device being tested.
- Connect the insulation tester leads: one to the conductor, the other to ground or another conductor.
- Select the test voltage (more on that in a moment).
- Press and hold the test button—don’t just tap it.
- Observe the reading after it stabilizes.
- Once done, disconnect leads and safely discharge the circuit again.
Voltage Range Selection and Interpretation of Results
Picking the right voltage is critical. For residential systems, 250V is usually enough. For 480V motors, go with 500V or 1000V. For industrial HV systems, 2.5kV to 10kV may be needed. As for results—higher is better. A reading of 1 MΩ or above is typically acceptable, but this depends on the equipment specs and environment. Anything under 1 MΩ is usually a red flag.
Applications of Megger in Real-World Testing
Cable Insulation Testing
One of the first things I learned as a junior tech was how critical cable integrity is. Using a Megger to test cable insulation can prevent disasters before they start. Whether it’s for underground power lines or control wiring, a quick test with a megohmmeter helps you catch moisture ingress, aging, or physical damage. Trust me—this test is faster (and cheaper) than dealing with cable failure.
Transformer Insulation Resistance Check
Transformers are the backbone of any electrical system, and their insulation can quietly deteriorate over time. I once caught a failing bushing on a step-up transformer just because a Megger reading dropped below expected values. Regular insulation tester checks on windings, bushings, and connections help ensure long life and safe operation.
Industrial and Residential Uses
In industrial plants, Meggers are indispensable. I’ve used them on motors, circuit breakers, busbars—you name it. And don’t think they’re only for big sites. In residential systems, they’re handy for checking wiring insulation, especially after water damage or rodent issues. Think of it as a health check-up for your wiring.
Special Use-Cases Like Marine or Aerospace
These environments are harsh—saltwater, vibration, pressure changes. I’ve seen Meggers used to test insulation on ship control systems and even aircraft electrical panels. The stakes are higher, and the margin for error is zero. In these sectors, using a high-quality insulation tester isn’t just a recommendation—it’s protocol.
Advantages and Disadvantages of Megger
Key Pros: Accuracy, Reliability, Portability
If you’ve ever worked with faulty wiring in a critical system, you’ll appreciate the reliability of a Megger. These tools are built for accuracy—even in tough field conditions. A quality insulation tester gives you consistent readings, helping you make fast, informed decisions. They’re also super portable. I’ve tossed mine in a toolbox, backpack, even carried it into a crawlspace without hassle.
Cons: Limitations in Low-Resistance or Noisy Environments
But let’s be honest—megohmmeters aren’t perfect. They’re not designed for low-resistance measurements, like checking continuity or bonding connections. In noisy electrical environments or where there’s residual voltage, you might get erratic readings. That’s why I always use a multimeter alongside my Megger—just to cover all bases.
Advanced Tips for Accurate Megger Readings
Environmental Factors and Test Conditions
One thing I learned the hard way—never trust a Megger reading without considering the environment. Moisture, dust, and even temperature can mess with your results. Always test in dry conditions when possible, and clean the surfaces around your test points. If you’re in a humid area, expect lower insulation resistance values—that’s normal.
Dealing with Fluctuating Readings
If your insulation tester readings keep jumping around, stop and check your connections. Loose clips or dirty leads are often the culprit. Also, make sure the circuit is fully discharged. I once chased a phantom fault for an hour—turns out it was leftover charge skewing the results.
Regular Calibration Tips
Like any measuring tool, a megohmmeter needs regular calibration. I send mine in every 6 months. If that’s not an option, use a known resistor to verify accuracy occasionally. It’s a small step that keeps your results trustworthy.
Watch Also: Thermoelectric Generators Explained: How the Seebeck Effect Powers Clean Energy
Common Misconceptions and Troubleshooting
Misuse of Voltage Range
One mistake I see all the time: using the wrong test voltage. Just because your Megger can crank out 1000V doesn’t mean you should use it on every device. Over-volting can damage sensitive components. Always match the insulation tester voltage to the equipment rating.
Misinterpretation of Pointer Movement
With analog megohmmeters, I’ve watched techs panic over a pointer dipping briefly before rising. That’s normal—it’s just the initial charging current. Wait for the needle to stabilize before judging the reading. Patience makes all the difference in getting reliable results.
Conclusion
In summary, the Megger—whether hand-cranked or digital—is a vital tool for testing insulation resistance. It offers accuracy, portability, and reliability in a wide range of applications. From simple insulation tester tasks to advanced megohmmeter diagnostics in industrial systems, knowing how to use and interpret this tool can prevent costly failures and ensure safety.
Looking ahead, expect smarter Meggers with wireless data logging, AI-assisted diagnostics, and integration into IoT platforms. As electrical systems become more complex, insulation testing will only grow in importance—so mastering this tool now will serve you well in the future.
FAQs
What is the principle of Megger?
The working principle of a Megger is based on electromagnetic induction. It uses a DC generator to apply a high voltage across an insulation path and measures the resulting current. The balance between the voltage coil and current coil determines the insulation resistance, which is displayed via a pointer or digital readout.
What are the different types of Megger?
There are several types of Meggers: the hand-operated Megger (manual crank), the digital Megger (electronic and battery-powered), and the high-voltage Megger (used for heavy-duty industrial and high-voltage systems). Each type is designed for specific test environments and voltage requirements.
What are the uses of Megger?
A Megger is used to measure the insulation resistance of electrical equipment and installations. Common applications include testing cables, motors, transformers, switchgear, and wiring in both industrial and residential settings. It ensures equipment safety and helps detect insulation breakdowns before failures occur.
What is the history of the megohmmeter?
The megohmmeter—often referred to as a Megger—was first introduced in 1889 by the British company Evershed & Vignoles. Originally a hand-cranked analog device, it evolved into today’s advanced digital testers. Over the decades, it has become an essential tool in the electrical industry, known for its reliability in diagnosing insulation health.
What is the minimum value acceptable?
Generally, a reading above 1 MΩ is acceptable for most equipment when using a Megger. However, the ideal value depends on voltage rating, application, and environmental conditions. Always refer to manufacturer guidelines.
Can a Megger damage a circuit?
Yes—if misused. Applying a high test voltage from an insulation tester to sensitive electronics can cause damage. Always ensure the circuit is rated for the selected test voltage.
What voltage settings are typical?
Common megohmmeter settings include 250V for low-voltage circuits, 500V for general electrical equipment, and 1000V or more for high-voltage systems. Choose the voltage based on the insulation rating of the device under test.